<![CDATA[Manuel van Rijn]]>2016-04-19T21:07:54+02:00http://manuelvanrijn.nl/Octopress<![CDATA[Rails subdomains for localhost/development]]>2015-05-19T23:00:00+02:00http://manuelvanrijn.nl/blog/2015/05/19/rails-subdomains-for-localhost-development Today I’ve just released version 1.0.0 of my latest gem local-subdomain offering subdomain support for your development environment, out of the box.
In this post I’d like to describe my findings and motivations.
What I’d used to do
To support subdomains during development is frustrating. By default you can’t have some subdomain.localhost to just bind to localhost.
So you have to edit your /etc/hosts file to add some fake subdomain and when you have to test another subdomain, you’d had to edit the file again and again and… well you get my point.
But then!
I’ve stubbled on the magic domain http://lvh.me which redirects all request (including subdomains) to 127.0.0.1. This means http://some-subdomain.lvh.me:3000 redirects to 127.0.0.1 on port 3000 and let request.subdomain to return some-subdomain within your Rails controller.
$ dig lvh.me
1234567891011121314151617181920
; <<>> DiG 9.8.3-P1 <<>> lvh.me
;; global options: +cmd
;; Got answer:
;; ->>HEADER<<- opcode: QUERY, status: NOERROR, id: 48494
;; flags: qr rd ra; QUERY: 1, ANSWER: 1, AUTHORITY: 2, ADDITIONAL: 0
;; QUESTION SECTION:
;lvh.me. IN A
;; ANSWER SECTION:
lvh.me. 3600 IN A 127.0.0.1
;; AUTHORITY SECTION:
lvh.me. 3600 IN NS ns36.domaincontrol.com.
lvh.me. 3600 IN NS ns35.domaincontrol.com.
;; Query time: 167 msec
;; SERVER: 90.145.32.32#53(90.145.32.32);; WHEN: Tue May 19 23:05:01 2015
;; MSG SIZE rcvd: 95
Why this gem?
This week I started on a side project, requiring subdomain support. I remembered that I could use http://lvh.me but when I browsed to the url it just said ERR_CONNECTION_REFUSED
After some time I remembered Rails binds the development environment by default to localhost which is != 127.0.0.1 where http://lvh.me is redirecting to..
So after fixing this, I remembered to have some code, that checks if you are browsing to http://localhost:3000 to redirect to http://lvh.me:3000. Just to help remember and enforce request for subdomains to go through http://lvh.me
So a gem it is!
As many developers, I don’t like to repeat myself, and decided to make the above two steps possible within a gem.
1. The before filter
The easy part was creating a module that adds a before_filter to the controller where the module LocalSubdomain is included. The action would check if the request is from lvh.me and if not, redirect to it. Nothing special.
This part was kind of tricky because we have to inject our code before the boot of Rails is triggered, to enforce the binding address localhost to be changed to 0.0.0.0.
After some reading about the rails initialization process and experimenting I noticed that the gems are required (and if so) executed before the Rack::Handler is being called, which will trigger a Ruby server to be executed (WEBrick by default).
While looking at the rack/handler.rb I noticed that the method self.default returns a Ruby server handler. Based on which Ruby server is being used, this will return a different handler.
After inspecting WEBrick’s and Puma’s rack handlers, I noticed, they both have the self.run method with the options argument, containing the Host which indicates the binding address.
Here’s a stipped part of the code I used in the gem, showing how to intercept the used Ruby server (Puma, WEBrick, …) handler and extend that handler, with a custom run method to be able to modify the options
moduleRackmoduleHandler# first override the self.default, to be able to intercept the handler# used by Puma, WEBrick, Thin, ... other?class<<selfalias_method:orig_default,:defaultenddefself.default(options={})# call the original method to return the handler and extend it's self.run methodorig_default.instance_evaldoclass<<selfalias_method:orig_run,:runenddefself.run(app,options={})env=(options[:environment]||Rails.env)# only modify the options[:Host] if environment is development# and options[:Host] equals 'localhost'ifoptions[:Host]=='localhost'&&env=='development'options.merge!(Host:'0.0.0.0')end# after modifications, trigger original run method with the new optionsorig_run(app,options)endend# don't forget to return the extended handlerorig_defaultendendend
Conclusion
After finishing these two pieces, I’ve bundled them into a Gem called local-subdomain, so I don’t have to add the before_filter and add -b 0.0.0.0 to my rails s command.
]]><![CDATA[OSX 10.10 Yosemite - Crashing Chrome]]>2014-06-03T22:34:00+02:00http://manuelvanrijn.nl/blog/2014/06/03/osx-10-dot-10-yosemite-crashing-chrome After watching the WWDC I couldn’t wait installing the latest OSX Yosemite because I love cutting edge tech and of course cutting edge software.
However I’ve ended up with a failing Google Chrome browser which I use like always!
The problem
It crashes directly after launching a page! Arghh!
The workaround (read almost fix)
After some googling I stumbled upon a solution where you have to set “Show scroll bars” to “Always”. This seemed to work at first, but still it seems to fail at some sites. However it’s beter than crashing directly.
Goto Settings -> General -> Show scroll bars -> Always
To be continued
As mentioned this fix seems to fail some times. I’ve had some troubles viewing some pull request on github but most of the time it seems to work.
If anybody finds a beter way to fix this please leave a comment :)
]]><![CDATA[Developing Ruby on Rails on Windows]]>2013-07-23T23:06:00+02:00http://manuelvanrijn.nl/blog/2013/07/23/developing-ruby-on-rails-on-windows I do a lot of C# web development which means I have to work with Visual Studio on Windows. I usually grab the Mac to do my Ruby on Rails development, but it would be easier not to switch every time I have to do C# and Ruby development.
A while ago I tried several things getting a fast Rails experience on Windows, but it failed. It was just too slow … until now! In this post I’d like to share my current setup which I plan to use as long as it pleases me.
What are we going to do?
We are going to install Vagrant which uses VirtualBox to build a complete development environment. Also we will create and use some recipes for Chef to automatically install and configure the development environment. Think of installing Ruby, PostgreSQL, and MySQL etc. automatically.
Installing Vagrant and VirtualBox
First let’s setup our Windows machine with the needed software.
After reboot add the VirtualBox folder to your PATH variable (something like: c:\Program Files\Oracle\VirtualBox)
Install a base box (I used Ubuntu precise 64 VirtualBox) with the following command
vagrant box add precise64 http://files.vagrantup.com/precise64.box
Prepare your Rails project
Next we have to configure our project to create a box from the base box and make it install all our goodies we need to run our Rails application.
Setup Chef (Librarian)
I’m using a gem called librarian-chef which actually is a bundler for your Chef recipes.
To install run the following from the root of you project:
12345678910111213141516
# Install librarian-chefgem install librarian-chef
# Add its work directories to your gitignoreecho chef/cookbooks >> .gitignore
echo chef/tmp >> .gitignore
# OPTIONAL: you can add the Cheffile.lock which holds the currently installed versions# just like bundler doesecho chef/Cheffile.lock >> .gitignore
# Create the Librarian config file and needed foldersmkdir -p chef
cd chef
mkdir -p roles
mkdir -p site-cookbooks
librarian-chef init
WUT?! gem install librarian-chef?
I know we are trying to create a non-Ruby Windows solution but we do need this gem to work on Windows to complete our setup with Chef. If you really don’t want Ruby being installed on Windows, you should do the above steps on UNIX or OSX and also have to commit the cookbooks. This means we’re back at 1900 where everybody stuffed there vendor folder with code they found… If you do want to perform this on Windows and haven’t already installed Ruby, you should do this now (I suggest RubyInstaller).
Configure Chef
The command librarian-chef init created the file chef/Cheffile where we can add our cookbooks. Mine contains the following:
As you can see I’ve setup Git, Ruby with rbenv, SQLite, MySQL, PostgreSQL and node.js for the asset pipeline. The apt cookbook is for running apt-get dist-upgrade and the cookbook database will be used later to create users to access the databases.
You could skip one or two of the database servers if you like, but it can’t harm if you do install them all and don’t use them.
Note: the database cookbook is provided with additional actions to set superuser privileges to PostgreSQL and MySQL.
Downloading the cookbooks
Now that we have defined our cookbooks we need to run our final command so that Chef downloads them. Just as you would do with bundler we now run the following command from our chef/ folder
1
librarian-chef install
Adding our custom recipes
I had some difficulties with running bundle install because the Vagrant user didn’t have permissions on the rbenv gem folder, so I had to add a custom recipe for this. Also I’ve added a recipe to modify the pg_hba.conf file of PostgreSQL so that we can connect with the virtual machine. Finally I’ve created a file to add our database users with full permissions. Here are the 3 files I added:
# Setup database servers## 1. Setup MySQL and PostgreSQL# 2. Create a rails user with a blank password with full control# MySQLmysql_connection_info={:host=>"localhost",:username=>'root',:password=>node['mysql']['server_root_password']}# 'rails'@'localhost'mysql_database_user'rails'doconnectionmysql_connection_infopassword''host'localhost'privileges["ALL PRIVILEGES"]grant_optiontrueaction:grantend# 'rails'@'%'mysql_database_user'rails'doconnectionmysql_connection_infopassword''host'%'privileges["ALL PRIVILEGES"]grant_optiontrueaction:grantend# PostgreSQLtemplate"#{node[:postgresql][:dir]}/pg_hba.conf"dosource"pg_hba.conf.erb"notifies:restart,"service[postgresql]",:immediatelyendpostgresql_connection_info={:host=>"localhost",:password=>node['postgresql']['password']['postgres']}postgresql_database_user'rails'doconnectionpostgresql_connection_infopassword''role_attributes:superuser=>true,:createdb=>trueaction:createend
Next we have to create a role that defines what recipes should be executed in what order. Create the file chef/roles/rails-dev.rb containing the following content:
chef/roles/rails-dev.rb
1234567891011121314151617181920212223
name"rails-dev"description"setup for ruby on rails core development"run_list("recipe[apt]","recipe[git]","recipe[sqlite]","recipe[mysql::client]","recipe[mysql::ruby]","recipe[mysql::server]","recipe[postgresql::ruby]","recipe[postgresql::server]","recipe[nodejs::install_from_binary]","recipe[ruby_build]","recipe[rbenv::system]","recipe[rbenv::vagrant]","recipe[database]","recipe[postinstall]")default_attributes("build_essential"=>{"compiletime"=>true})
If you removed some cookbooks from the chef/Cheffile you should also remove them here.
Setup Vagrant
Next we need to create a Vagrantfile that contains the configurations for creating a box from the base box. Create the config file by running from the root of you project:
1
vagrant init precise64
Note: precise64 is the name we used with the vagrant box add command from step 4 above.
Also we want to add the virtual machine folder to our .gitignore file:
1
echo .vagrant >> .gitignore
Modify the Vagrantfile
Here’s the stripped version of how my file looks like:
Vagrant.configure("2")do|config|config.vm.box="precise64"config.vm.box_url="http://files.vagrantup.com/precise64.box"config.vm.network:forwarded_port,guest:3000,host:3000# forward the default rails portconfig.vm.network:forwarded_port,guest:3306,host:3306# forward the MySQL portconfig.vm.network:forwarded_port,guest:5432,host:5432# forward the PostgreSQL portconfig.vm.provision:shell,:inline=>"gem install chef --version 11.6.0"config.vm.provision:chef_solodo|chef|chef.cookbooks_path=["chef/cookbooks","chef/site-cookbooks"]chef.roles_path=[[:host,"chef/roles"]]chef.add_role"rails-dev"chef.json={"mysql"=>{"server_root_password"=>"","server_debian_password"=>"","server_repl_password"=>""},"postgresql"=>{"password"=>{"postgres"=>""}},"rbenv"=>{"global"=>"2.0.0-p247","rubies"=>["2.0.0-p247"],"gems"=>{"2.0.0-p247"=>[{"name"=>"bundler"}]}}}endend
Ready to rock!
Alright we’re ready. We now can boot up Vagrant which will take some time the first time because it will create a new box from the base box and install all the cookbooks. From then you’re able to connect with the box and use it just like you would do on UNIX or OSX.
123456789101112
# starts and setups the boxvagrant up
# ... now we wait ...# connect to the box with sshvagrant ssh
# install gems and run the server on the box for a Rails applicationcd /vagrant
bundle install
bundle exec rails s
What we’ve created
A VirtualBox with Ubuntu precise 64 installed and containing the following software/configurations:
Software:
rbenv with ruby-build
ruby-2.0.0-p247
Git
SQLite
MySQL with user: rails with a empty password
PostgreSQL with user: rails with a empty password
node.js
Ports:
localhost:3000 goes to vagrant-box:3000
localhost:3306 goes to vagrant-box:3306
localhost:5432 goes to vagrant-box:5432
Develop workflow
If you have to run specific Ruby (on Rails) tasks like rspec or bundle exec rails g migration you should do this within the ssh session of your box.
Editing files can be done on your Windows machine, because the root of you project is directly binded to the /vagrant/ folder on the box.
]]><![CDATA[Rails belongs_to to has_many]]>2013-03-04T17:19:00+01:00http://manuelvanrijn.nl/blog/2013/03/04/rails-belongs-to-to-has-many Today I had to change a belongs_to associate to an has_and_belongs_to_many in a Rails project I’m currently working on. Not that hard you would say, but there were some catches for deploying/migrating these changes to the production environment.
In this post I’d like to explain how to achieve this without having to do multiple deployments of your model to maintain a consistent database schema and model.
TL;DR;
Here you can find the final migration. Note that this example could also be solved with plain sql instead of using ActiveRecord, but there might be cases were you depend on the ActiveRecord associates. In these cases this is a great workaround
The problem
Let’s say we have a Article that belongs to a Category. Our model would look like something like this:
At this point all is fine and we can migrate the database without any problems. Only this doesn’t add the current category to the new collection of categories.
Moving the belongs_to associate
Here’s were the problem actually starts, because to move the category to the categories collection for the articles, we have to define the belongs_to but also the has_and_belongs_to_many associate on the Article model.
I don’t like this approach because we’ll have to define both these associates and the belongs_to should be removed in the next release. So how to deal with this?
The fix
The fix is quite simple. We remove the belongs_to associate from the model and only define the new has_and_belongs_to_many associate and within the migration we extend the model with the “old” belongs_to associate so we can use this within the migration.
classMultipleCategoriesForArticles<ActiveRecord::Migrationdefupcreate_table:articles_categories,:id=>falsedo|t|t.references:article,:categoryend# define the old belongs_to category associateArticle.class_evaldobelongs_to:old_category,:class_name=>"Category",:foreign_key=>"category_id"end# add the belongs_to category to the has_and_belongs_to_many categoriesArticle.all.eachdo|article|unlessarticle.old_category.nil?article.categories<<article.old_categoryarticle.saveendend# remove the old category_id column for the belongs_to associateremove_column:articles,:category_idenddefdownadd_column:articles,:category_id,:integerArticle.class_evaldobelongs_to:new_category,:class_name=>"Category",:foreign_key=>"category_id"endArticle.all.eachdo|article|# NOTE: we'll grabe the first category (if present), so if there are more, these will be lost!article.new_category=article.categories.firstunlessarticle.categories.empty?article.saveenddrop_table:articles_categoriesendend
]]><![CDATA[Sidekiq on Heroku with Redis To Go Nano]]>2012-11-13T15:42:00+01:00http://manuelvanrijn.nl/blog/2012/11/13/sidekiq-on-heroku-with-redistogo-nano As a follow-up of my previous post I want to explain how to get Sidekiq to work on Heroku with a Redis To Go Nano instance.
Because the Nano instance has some connection limitation you have to make some config changes so you won’t get ERR max number of clients reached error messages.
Why this post
Today I’ve been struggling a lot with getting the Sidekiq to work probably with Redis to Go Nano on Heroku. The main problem was I was having difficulties with the amount of connection’s being created to the Redis server. Because the Nano variant is free but large enough for handling normal sized queues of work, we have to face the limitation of 10 connections.
A calculation Tool!
If you just want to know what you need to change/setup you can go directly to a small tool I’ve built to calculate the number of connections/concurrencies need for a number of workers/web workers etc.
The error Error fetching message: ERR max number of clients reached, is quite clear isn’t it? The actual question is how we can reduce the connections being opened to match the 10 connection limit given by the Nano instance.
After some research I found the factors that you have to tweak in order to reach the magic number of 10.
Sidekiq Client connection size
Sidekiq Server connection size
Sidekiq Server reserved connections (reserved for the Fetcher and Retrier)
Sidekiq concurrency size
Unicorn worker_process size
Heroku Web Dyno count
Heroku Worker count
The answer for all our problems could be described in the following sum:
If you have a small amount of Redis connections we need to make some modifications in order to get all our processes happy and not throwing connection errors around.
At the bottom of this post I’ll put my final configuration files.
Dynos * (unicorns * client size)
The first thing I changed was the Redis connection size for the client. By default Sidekiq takes 5 connections per client. Because my applications only queries Redis for adding tasks to the Sidekiq queue, one connection should be more than enough.
One mistake I made was forgetting about the number of dynos and Unicorn worker_process size. In my app/config/unicorn.rb I had worker_processes 3 defined which actually means 3 workers * dyno count = redis_connections taken by the Client.
Examples:
In my case where I’ve set the connection size to one we could have the following examples
1 web dyno with 2 unicorn worker_processes takes 2 Redis connections
2 web dyno with 2 unicorn worker_processes takes 4 Redis connections
5 web dyno with 4 unicorn worker_processes takes 20 Redis connections
If you up the client size to, for example 3 you should also multiply the Redis connections by this number (so for example 3 you’ll have 20 * 3 = 60 connections).
Worker * (concurrency + 2)
When calculating the number of connections the Sidekiq server needs, we need to modify the number of currencies it initializes on launch. This number represents the number of threads created by the Sidekiq server which will perform queued tasks. Each concurrency/thread takes up 1 Redis connection.
When tweaking this number I found out the Sidekiq server took 2 additional connections upon the concurrency number. This seemed to be default behavior becase Sidekiq server uses these two for the Fetcher and Retrier commands.
The default concurrency size of Sidekiq is set to 25 which mean that without modifications you need at least 27 Redis connections for the Sidekiq server.
My final code
1234567
connection limit:           10
unicorn processes:           3
web dynos:                   2
worker dynos (sidekiq):      1
client pool size:            1
server pool size:            2
concurrency:                 2
]]><![CDATA[Scalable Heroku worker for Sidekiq]]>2012-11-13T09:02:00+01:00http://manuelvanrijn.nl/blog/2012/11/13/scalable-heroku-worker-for-sidekiq In this post I’d like to show you guys how to deploy your Rails application to Heroku with a Sidekiq worker that only gets initiated when there are tasks in the queue to process.
Our goal is to start a worker when a task is added to the queue and to destroy the worker after its done processing the queue tasks. This will result in a much lower bill at the end of the month because the worker doesn’t have to be up the whole month.
Setting up Sidekiq
First let’s take a look at a default configuration of Sidekiq within a Rails project.
Add the gem
First we need to add Sidekiq to our Gemfile and run bundle install
Gemfile
1
gem'sidekiq'
Create a Sidekiq worker
The worker is very basic. It just performs some heavy task and sends an email after it finished.
On the controller we probably have a line calling object.generate_download which takes to much time. We’ll change this line to execute the MyWorker instead:
app/controllers/download_controller.rb
1234567
classDownloadController<ApplicationControllerdefgenerateobject=Model.find(param[:id])# instead of calling object.generate_download we'll do:MyWorker.perform_async(object.id)endend
NOTE: It’s recommended not to add the whole object into the worker because this is stored in the Redis database. Also the object might be changed before it’s being processed by Sidekiq. Adding the id and fetching the object in the worker is a better approach.
So far…
At this point we have configured our Rails project to add tasks to Redis and have Sidekiq perform executing the worker when a task is added. If we deploy our Rails app to Heroku we need to add the Redis To Go addon and add a Heroku worker dyno to our application.
Running locally
To test this locally we need:
Redis installed locally and running
Run the Rails app (bundle exec rails server)
Run the Sidekiq server (bundle exec sidekiq)
Adding the autoscaler
At this point the Heroku worker dyno has to be started, to pickup tasks from the queue. It’s likely you do not need this worker to run the whole day because the queue might be empty most of the time. Here’s where the autoscaler gem come’s in handy.
This gem acts as Middleware for Sidekiq and performs the following tasks:
When a task is added it checks if a Worker is present.
When a worker is already running it does nothing and the worker will pickup the task.
If there isn’t a worker running it will create a Heroku worker dyno.
If the worker finished processing the queue it will keep the worker alive for 60 seconds just in case we add a task to the queue within this time. If no tasks are added it will destroy the worker.
Add the gem
First we need to add the autoscaler gem to our Gemfile and run bundle install
Gemfile
1
gem'autoscaler'
Adding required ENV variables
The gem requires two environment variables to be set on your Heroku application. The HEROKU_API_KEY is required to perform creating and removing a Heroku worker dyno and the HEROKU_APP to know on which application it has to create/destroy the worker dyno on.
123
# API KEY can be found on https://dashboard.heroku.com/accountheroku config:add HEROKU_API_KEY=123-your-key-456
heroku config:add HEROKU_APP=your_heroku_app_name
Tweaking the Sidekiq initializer
Because this gem acts as Middleware we need to create a sidekiq.rb in our initializers folder. This file will check if we are running on Heroku and if so, activates the autoscaler as Middleware.
app/config/initializers/sidekiq.rb
123456789101112131415161718192021222324252627
require'sidekiq'require'autoscaler/sidekiq'require'autoscaler/heroku_scaler'heroku=nilifENV['HEROKU_APP']heroku=Autoscaler::HerokuScaler.newendSidekiq.configure_clientdo|config|ifherokuconfig.client_middlewaredo|chain|chain.addAutoscaler::Sidekiq::Client,'default'=>herokuendendendSidekiq.configure_serverdo|config|config.server_middlewaredo|chain|ifherokup"[Sidekiq] Running on Heroku, autoscaler is used"chain.add(Autoscaler::Sidekiq::Server,heroku,60)# 60 seconds timeoutelsep"[Sidekiq] Running locally, so autoscaler isn't used"endendend
Ready to go!
At this point we’re ready to deploy our application to Heroku and let the autscaler automatically create and destroy a worker dyno whenever it needs to process tasks from the Sidekiq queue.
]]><![CDATA[Yeoman meets Travis CI]]>2012-09-17T14:45:00+02:00http://manuelvanrijn.nl/blog/2012/09/17/yeoman-meets-travis-ci Today I’d like to show how you can integrate Travis CI within your Yeoman project.
Travis CI is a hosted continuous integration service for open source projects and Yeoman is a robust and opinionated set of tools, libraries, and a workflow that can help developers quickly build beautiful, compelling web apps.
Adding Travis CI support
When Yeoman was released I’ve tried to add Travis CI support to a test project. After setting everything up there seemed to be a problem with the update check being fired when running tests. This was annoying because Travis CI was waiting for input from the user.
So I’ve fixed the issue and created a pull request that was merged very quick thanks to Addy Osmani.
Anyway today I saw that there was a new version released which includes my fix and I like to share how you can make your Yeoman project be tested within Travis CI.
TL;DR;
See this commit with all the changes you have to make to your existing Yeoman project in order to get Travis CI integration.
First we have to add the yeoman package as a dependency to our package.json file because we can’t install yeoman globally on Travis CI.
123
"devDependencies":{"yeoman":"~0.9.1"}
After adding the dependency and running npm install you’ll see that yeoman is installed in the node_modules folder of your project.
Setup npm test script
Travis CI runs the npm test command after fetching the project and installing the dependencies. To make npm test run the Yeoman test task, we need to add the following line into our package.json file.
I’ve added the --verbose argument because I’d like to see detailed information when my tests fail, but this is an optional argument.
At this point you should be able to run npm test and see Yeoman running your tests.
Add the .travis.yml file
Finally we have to add a .travis.yml file to let Travis CI know what language our project is and on which version(s) of NodeJS it should use to test our project against (note: Yeoman requires >= 0.8).
1234
language:node_jsnode_js:-0.8-0.9
Hook & Push!
The final step is to add the Travis CI hook to you project in GitHub and push your project.
Happy coding!
]]><![CDATA[SELECT total_rows FROM database]]>2012-07-26T14:34:00+02:00http://manuelvanrijn.nl/blog/2012/07/26/select-total-rows-from-database On the first of August this year, Heroku will add 2 new plans to their database add-on known as Dev and Basic. Both plans have a row limit restriction and that made me thinking how I could fetch that number with one simple query.
TL;DR
Of course you already know the stuff described below so go to the final query.
Getting the list with tables
For retrieving almost any information about your database you can query the pg_class see Postgres documentation.
The relkind is set to r to query only ordinary table information.
We are joining the pg_namespace table to filter out the pg_catalog and information_schema tables
As result we’ll have on column called tableName with all tables from the database
Adding the total number of rows was quite simple after reading the Postgres documentation. It seems that the pg_class contains a column called reltuples that holds the number of rows in the table.
So adding this column to the select seems to do the trick:
With this query it was easy to transform it into a SUM for all rowCount’s we retrieve. Here’s the final query to retrieve the total number of rows from all tables of a Postgres database
]]><![CDATA[Integrate Travis CI into Grunt]]>2012-06-22T15:04:00+02:00http://manuelvanrijn.nl/blog/2012/06/22/integrate-travis-ci-into-grunt Today I’ve done some research how to get my latest jQuery plugin (jquery-numeric_input) to be tested automatically with the help of Travis CI. Travis CI is a hosted continuous integration service for open source projects.
Because I’ve just finished the latest functionality of the plugin I wanted to add the project to Travis CI, just like I do with all my other projects (the ones with unit tests).
Grunt
For the development of the plugin I used Grunt which is a task-based command line build tool for JavaScript projects. Starting a new project is as easy as running grunt init:jquery and you have a entire generated jQuery plugin project.
By default this command configures a jQuery plugin, QUnit test suite, sample plugin, sample tests and some grunt tasks you can use. Running the grunt command in your project folder will execute the default task meaning:
Really easy to get started coding instead of setting up your environment :)
Integration with Travis CI
Ok so at this point I want to add my project to Travis CI so that it tests my suite when pushing new branches/commits to Github. To do this we have to make a few changes.
I’d like to keep the Grunt tasks organized so I register a new task called travis below the default task.
grunt.js
12345
// Default task.grunt.registerTask('default','lint qunit concat min');// Travis CI task.grunt.registerTask('travis','lint qunit');
As you can see I only added lint and qunit because we don’t have to concatenate or minify a new build of our plugin. At this point you are able to run grunt travis from the command line.
Adding the dependency
Now we have to add Grunt as a dependency to our package.json file so that npm running on Travis CI knows it has to install Grunt. Mine dependencies block looks like this:
Travis CI runs npm test after it fetched your project and installed the dependencies, so we need to add this task to the package.json file.
package.json
123
"scripts":{"test":"grunt travis --verbose"}
I’ve added the --verbose option, so we’ll see more output of what is going on.
Adding the .travis.yml
Every Travis CI project needs to have a .travis.yml file in the root of the project folder, so it know what platform and version it should use to build/test your project. Here’s the one I used:
.travis.yml
12345
language:node_jsnode_js:-0.6-0.8-0.9
Ready to go!
Alright after these changes your project is ready to be continuously builded with Travis CI. But don’t forget to setup the Service Hook on Github!
Update
Thanks to Ryan Seddon and Ariya Hidayat for noticing me that the before_script section for running PhantomJS on the headless server on Travis CI isn’t needed. See this link
]]><![CDATA[Taking MemSQL for a spin]]>2012-06-20T10:18:00+02:00http://manuelvanrijn.nl/blog/2012/06/20/taking-memsql-for-a-spin This week I read an article on HackerNews about Ex-facebook employs releasing a new database server called MemSQL.
After viewing there product overview video I got excited and wanted to take this product for a spin.
What to test?
First I needed a project for testing the performance on. At my work we developed a Rails application that needs to validate a permit request with rules, questions, filters, answers depending on a region etc. etc. This process of validating a whole permit request takes some time because it has to perform 6850 queries.
Performance PostgreSQL
At this moment the application runs on a PostgreSQL database so lets see what the performance is at this point:
1234
run       user     system      total        real
#01  10.690000   0.540000  11.230000 ( 14.828312)
#02   9.450000   0.490000   9.940000 ( 13.895988)
#03   9.550000   0.470000  10.020000 ( 14.215028)
The average result is that it takes 14.312ms for 6850 queries on PostgreSQL.
Configuring the Rails app to use MemSQL
After installing MemSQL and starting it running on port 3307, I created a new database added the existing data and changed some connection strings for the Rails app.
mysql2 gem
Because MemSQL is built on top of MySQL you can use all the MySQL client tools to perform operations on MemSQL.
The MemSQL documentation recommended using the memsql2 gem but to do this I had to install MySQL first on my machine.
Failed to connect?
After installing MySQL and configured the Rails application I got some strange error when starting the application.
1234
Failed to connect to database:
  Sequel::AdapterNotFound -> LoadError: dlopen(.rbenv/versions/1.9.3-p194/lib/ruby/gems/1.9.1/gems/mysql2-0.3.11/lib/mysql2/mysql2.bundle, 9): Library not loaded: /usr/local/mysql/lib/libmysqlclient.16.dylib
  Referenced from: /Users/mvanrijn/.rbenv/versions/1.9.3-p194/lib/ruby/gems/1.9.1/gems/mysql2-0.3.11/lib/mysql2/mysql2.bundle
  Reason: image not found - /Users/mvanrijn/.rbenv/versions/1.9.3-p194/lib/ruby/gems/1.9.1/gems/mysql2-0.3.11/lib/mysql2/mysql2.bundle
After some googling I found out that on OSX you might need to symlink the dylib manually. NOTE Because I’ve installed a newer version of MySQL I have a libmysqlclient.18.dylib instead of the required libmysqlclient.16.dylib. Symlinking this file from libmysqlclient.18.dylib to libmysqlclient.16.dylib seemed to work for me.
So after resolving all these issues I was able to run the benchmark, but the first run took 3 min and 05 seconds! First I thought that this can not be right, but I forgot the fact that it generate’s c code from the queries.
On the MemSQL server I got the following output:
123456
29089195192012-06-2009:56:16INFO:Queryappdb.'SELECT `permit_requests`.* FROM `permit_requests` WHERE `permit_requests`.`id` = @ LIMIT @'compiledin7306milliseconds29089836372012-06-2009:56:16WARNING:WARNDISABLEDLOCKDOWN:BEGINTRANSACTION29162402272012-06-2009:56:23INFO:Queryappdb.'SELECT `categories`.* FROM `categories` WHERE `categories`.`id` = @ ORDER BY name LIMIT @'compiledin7203milliseconds29241431422012-06-2009:56:31INFO:Queryappdb.'SELECT `questions`.* FROM `questions` WHERE `questions`.`category_id` = @ ORDER BY position'compiledin7722milliseconds...etc...
As you can see, generating the compiled version for every query took about 7 seconds.
Performance MemSQL
So below again the same table with results. The first line is the time with generating all the compiled queries:
The performance boost is quite huge! The average result is 6.635ms for 6850 queries if we are skipping the first result. This means it’s like 7.677ms faster!
Cold boot of MemSQL
I’ve also tried the performance when I restart the database server. I just wanted to know if it keeps the data in memory and would take longer to run after a restart.
The first time it took just a bit longer, but with an average of 7.044ms for 6850 queries this is still faster than running it on PostgreSQL!
Pros and Cons
Here’s a list with some pros and cons I noticed while experimenting with MemSQL:
Pros
Blazing fast!
You can use all the MySQL client tools out there. Also because it uses MySQL, troubleshooting might not be an issue because it isn’t a new product.
Cons
Huge cache folder! After restoring the database (15Mb) MemSQL creates a folder in the plancache folder which is 5.5GB. So performance comes with a price I think.
Unable to create users. When creating the database, I tried to add a new user but this isn’t supported. Maybe this is because I’m using the Developer Edition.
]]><![CDATA[Installing Android SKD for Eclipse]]>2012-04-04T09:53:00+02:00http://manuelvanrijn.nl/blog/2012/04/04/installing-android-skd-for-eclipse Today I was trying to install the Android SDK for Eclipse for a new project I’ll work on. After downloading the necessary packages I got some strange error I couldn’t resolve quickly, so I like to share the solution with you guys.
The error Eclipse returned was
1234
Cannot complete the install because one or more required items could not be found.
Software being installed: Android Development Tools **** (com.android.ide.eclipse.adt.feature.group ****)
Missing requirement: Android Development Tools **** (com.android.ide.eclipse.adt.feature.group ****)
requires 'org.eclipse.wst.sse.core 0.0.0' but it could not be found
What I did to produce the error
I installed Eclipse and the Android SDK tested the Android SDK by creating an AVD.
After running Eclipse I tried to add the https://dl-ssl.google.com/android/eclipse/ url to my Available Software Sites to install the Eclipse package. After selecting all the Developer Tools in the filtered list for this Software Site and hitting Next I received the error as I added above
The solution
After some googling I found a tip that I needed to add another Software Site to Eclipse.
After adding http://download.eclipse.org/releases/indigo and retrying to install the Android Developer Tools all went well.
]]><![CDATA[Failed to build gem native extension]]>2012-03-20T13:14:00+01:00http://manuelvanrijn.nl/blog/2012/03/20/failed-to-build-gem-native-extension
Today I had to reinstall my Linux installation because my harddisk died a quick dead. While configuring all the software I use to develop I got some weird error after I’d installed rbenv and tried to execute bundle install on one of our projects.
The error
The following error was raised when I tried to install capybara-webkit
12345678910
Installing capybara-webkit (0.10.1) with native extensions
Gem::Installer::ExtensionBuildError: ERROR: Failed to build gem native extension.

/home/manuel/.rbenv/versions/1.9.3-p125/bin/ruby extconf.rb
sh: qmake: not found

Gem files will remain installed in /home/manuel/.rbenv/versions/1.9.3-p125/lib/ruby/gems/1.9.1/gems/capybara-webkit-0.10.1 for inspection.
Results logged to /home/manuel/.rbenv/versions/1.9.3-p125/lib/ruby/gems/1.9.1/gems/capybara-webkit-0.10.1/./gem_make.out
An error occured while installing capybara-webkit (0.10.1), and Bundler cannot continue.
Make sure that `gem install capybara-webkit -v '0.10.1'` succeeds before bundling.
The solution
I first thought there were some problems with make or cmake because that’s what the error says. qmake: not found, but that didn’t seem to be te real problem.
After some googlefoo I found out that I was missing the libqtwebkit-dev package. So the problem in this case was easily resolved by running:
1
sudo apt-get install libqtwebkit-dev
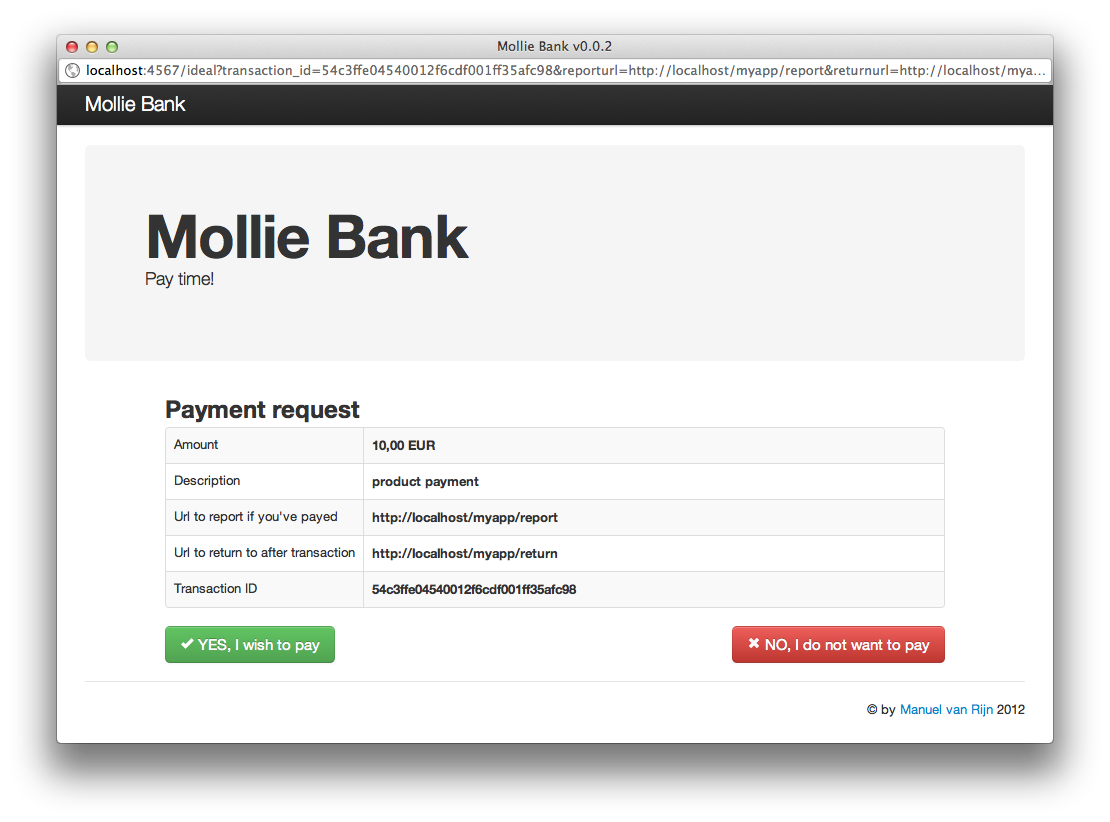
]]><![CDATA[Mollie Bank]]>2012-02-29T21:29:00+01:00http://manuelvanrijn.nl/blog/2012/02/29/mollie-bankThe past week I’ve been working with the iDeal API from Mollie. Mollie is a company that give’s us developers an easy way to make iDeal payments through there API, for a small fee.
After a long search I wasn’t able to find a stable, well tested gem, I could use in our Rails project, so I developed the ideal-mollie gem. After I finishing this gem, there was only one problem.
When you want to test a iDeal transaction with the Mollie test bank, you MUST do some routing, so that Mollie can send you a request if the payment was paid or not, to your local machine from the internet. So I made a alternative Mollie test bank you can use for what ever programming language you use for making Mollie iDeal payments without the routing problems.
There’s a gem for that!
I’ve came op with a gem that runs a small Sinatra application that does exactly the same as the Mollie test bank, only it runs on your local machine, which means you can redirect to localhost and more important, it can perform the payment check.
Alright so now you only have to make sure that when you’re developing on your local machine, you don’t make the requests to Mollie but to your locally running Mollie Bank.
To do this you just have to change https://secure.mollie.nl into http://localhost:4567 in you code.
]]><![CDATA[“Rake, pull me that DB!”]]>2012-01-19T15:15:00+01:00http://manuelvanrijn.nl/blog/2012/01/19/rake-pull-me-that-dbAfter writing my last article how to Convert PostgreSQL to SQLite, I was asked why this couldn’t be automated?
So I started coding and managed to create a Rake task that will do all of the steps I described in the article in just a few seconds!
Update
Today a found a project that does exactly the samething as the below rake task, but with support for more db providers. Heroku uses this project for retrieving and pushing you database to the heroku database server.
remove old dump and ssh the new dump to tmp/dump.sql
converts the dumped SQL in to a valid format for SQLite
remembers the version number of the migration on the production db
backup, create and migrates the development SQLite to the version remembered
import the SQL
tell you all went well
Configuration
To use the Rake task, you have to add 2 additional fields (ssh_user and ssh_host) to your database.yml file. These fields are used to create an ssh connection for retrieving the PostgreSQL dump.
Here’s example of a modified config/database.yml:
Get the Rake file
Put the following code into libs/tasks/database.rake
Usage
1
bundle exec rake db:pull
No SSH?
If you want to skip the step where the rake tasks get’s the dump using ssh, you have to copy the dump.sql into the tmp folder by yourself (note that the name must be dump.sql)
After you copied it, you should execute the following commands, to generate the development database with the dumped sql.
Want to skip entering the ssh password every time?
You could generate a public/private key pair with RSA and append that key to the production server so you don’t have to enter the password over and over again to connect with ssh.
1. Generate a public/private key pair with RSA
First check if you haven’t already generated a id_rsa file in your $HOME/.shh folder. If you already have a id_rsa file continue with step 2.
Run the following command on you local machine and accept the defaults.
1
ssh-keygen -t rsa
This command creates an RSA public/private key pair in your $HOME/.ssh directory. The private key is ~/.ssh/id_rsa and the public key is ~/.ssh/id_rsa.pub
2. Install public key on remote machine
Now you can copy the public key to the remote machine by executing the following command:
1
ssh-copy-id -i root@productionserver.com
This command will ask you to enter the ssh password for the ssh user “root” for the hostname “productionserver.com”.
After you’ve enter the password (for the last time) you can create a ssh connection without entering the password by executing:
1
ssh root@productionserver.com
]]><![CDATA[Convert PostgreSQL to SQLite]]>2012-01-18T00:30:00+01:00http://manuelvanrijn.nl/blog/2012/01/18/convert-postgresql-to-sqlite
Today I’d like to share the steps I take when I need to convert a PostgreSQL database into a SQLite database.
Commonly I have to do this when a Ruby on Rails application is in production and I have to check some issues with the production data. In the production environment we usually use a PostgreSQL database and for developing I use a SQLite database, so we need some conversion.
Short story a.k.a I know what I’m doing.
Create a dump of the PostgreSQL database.
ssh -C username@hostname.com pg_dump --data-only --inserts YOUR_DB_NAME > dump.sql
Remove/modify the dump.
Remove the lines starting with SET
Remove the lines starting with SELECT pg_catalog.setval
Replace true for ‘t’
Replace false for ‘f’
Add BEGIN; as first line and END; as last line
Recreate an empty development database.
bundle exec rake db:migrate
Import the dump.
123
sqlite3 db/development.sqlite3
sqlite> delete from schema_migrations;
sqlite> .read dump.sql
Longer story a.k.a please explain a little more.
So basically you can do the following 4 major steps to convert the PostgreSQL database into a SQLite database.
1. Generate a SQL dump
First we have to create a sql dump on the production server. I use the following command that results in a dump.sql file in the current folder:
I use the --data-only option, so it doesn’t generate the schema. Converting the pg_dump generate schema to a valid SQLite schema gave me a lot of difficulties so I chose to generate the schema with the rake db task (we’ll discuss this in the next step).
After you created the dump, you have to download/transfer/mail/etc. that file so you have local access to it.
Trick: Got ssh access?
If you have ssh access, you can also run the following command, which will output the file directly on you local drive
There are a few manual find/replace and delete action’s you have to perform on the dump.sql file by hand.
2.1 Remove the SET statements at the top
You will see some statements at the top of the file like SET statement_timeout = 0; and SET client_encoding = 'SQL_ASCII'; etc. Remove all of these lines that start with SET, because SQLite doesn’t use these.
2.2 Remove the setval sequence queries
Under the SET queries you’ll see some queries to set the correct sequence for auto incrementing the id’s. SQLite doesn’t keep these value’s in a catalog and must be removed to prevent errors.
Remove all the line’s that look like SELECT pg_catalog.setval('MY_OBJECT_id_seq', 10, true);
2.3 Replace true => ‘t’ and false => ‘f’
The pg_dump generate’s true and false as value’s for the INSERT INTO statements. If we want to import these to SQLite we have to replace these to ‘t’ and ‘f’.
1234
-- These:INSERTINTOtable_nameVALUES(1,true,false);-- Should be replace to:INSERTINTOtable_nameVALUES(1,'t','f');
2.4 Transactions. Make it fast!
The first time I imported the dump (that was 2 mb) it took like 12 minutes to complete! After some googling I found out that SQLite’s default behavior is putting each statement into a transaction, which seems to be the time waster (after the fix it toke 12 seconds).
To prevent this behavior you can run the script within 1 transaction by specifying BEGIN; at the top of the dump.sql and END; at the end of the file.
So you would have:
123
BEGIN;-- a lot of INSERT INTO statmentsEND;
3. Recreate the development database
So now we have fetched the production data from the PostgreSQL database, we need to recreate the development.sqlite3 database.
You must run the migration until the migrated version that is active on the production database. If not, you could have the situation where you have dropped a column and can’t import the dump because the data depends on that column.
Check the dump.sql for the latest version number in the schema_migrations table and migrate to that version.
For example for the version 20121701120000 you would do:
The final step is importing the dump file. To do this we have to execute the following command within a terminal:
123
sqlite3 db/development.sqlite3
sqlite> delete from schema_migrations;
sqlite> .read dump.sql
As you can see we first remove the records from the schema_migrations table, because these are also included in the dump.sql. Of course you could also remove the lines from the file, but I prefer this way.
The .read command just execute’s all the lines within the specified file.
Result
And that’s it! You now have a stuffed development.sqlite3 database with all the production data out of the PostgreSQL database.
Today I’ve had some difficulties with a Rails migration, that took ages to complete. After some debugging I figured out that the issues was because of the before_save and after_save callbacks.
Of course we could remove the before and after save callbacks to speed up the process, but I don’t like the idea of releasing a model that misses these behavior. I mean they’re not there for no reason right?
After some googling I found a quick and easy way to disable the callbacks without modifying the model. Here’s an simple example of a model class and a migration the disable the callbacks only within the migration.
Code solution
app/models/some_model.rb
123456789101112131415
classSomeModel<ActiveRecord::Basebefore_save:before_actionafter_save:after_actionprivatedefbefore_action# heavy calculation/queriesputs"you shouldn't see this"enddefafter_action# another heavy calculation/queriesputs"you shouldn't see this"endend
db/migrations/20120112092136_update_some_model.rb
123456789101112131415161718
classUpdateSomeModel<ActiveRecord::Migrationdefup# disable the before_saveSomeModel.skip_callback(:save,:before,:before_action)# disable the after_saveSomeModel.skip_callback(:save,:after,:after_action)SomeModel.all.eachdo|obj|# .. modify obj ...obj.save# you shouldn't see the puts defined in the SomeModel before and after actionsendenddefdownendend
Supported callbacks
In the above example I show only two rails callbacks. Here’s a list of the supported callbacks you also can disable with it.
:after_initialize
:after_find
:after_touch
:before_validation
:after_validation
:before_save
:around_save
:after_save
:before_create
:around_create
:after_create
:before_update
:around_update
:after_update
:before_destroy
:around_destroy
:after_destroy
:after_commit
:after_rollback
Hope these could help you out some day =)
]]><![CDATA[Shrinking your Git repository]]>2011-12-22T15:01:00+01:00http://manuelvanrijn.nl/blog/2011/12/22/shrinking-your-git-repositoryIn the past weeks I’ve looked into a problem that kept us from releasing to Heroku, because the git repository was to large. In time the repository has grown to approximate 180 Mb.
In the past we’ve made some decisions that we probably wouldn’t take again. We for example, we decided to store the gem files in the vendor folder and having the rails code included in our repository. Our goal then was, that releasing the project with Capistrano would be easier and faster, because it didn’t have to download all the gem’s.
Anyway at this point we don’t have the gem’s stored anymore in the vendor folder. Since tools like RVM and rbenv we store these within the ruby/rails version of that specific project.
Still we have the problem that the repository contains files etc. we want to remove to shrink the size of it.
Find large files from your git history
First we have to track down what files are making our repository so large. I’ve found a perl script that scans your repository for files of a specific size. Here’s the code:
So I’ve placed this file within my repository and executed the below command to see all files, from all commits, that are bigger then 500 Kb
1
perl git-large-files.pl 500k
This give’s you an output like:
1234567891011121314
9794784 6 weeks ago
  609280  vendor/cache/builder-3.0.0.gem
  823808  vendor/cache/ffi-1.0.9.gem
  801792  vendor/cache/gherkin-2.4.21.gem
.... more ....
874451c 3 months ago
  609280  vendor/bundle/ruby/1.9.1/cache/builder-3.0.0.gem
  823808  vendor/bundle/ruby/1.9.1/cache/ffi-1.0.9.gem
  801792  vendor/bundle/ruby/1.9.1/cache/gherkin-2.4.21.gem
.... more ....
47ebdca 1 year, 1 month ago
  15467626  vendor/gems/webrat-0.7.1/vendor/selenium-server.jar
  6185324 vendor/rails/activerecord/examples/performance.sql
  14465482  log/development.log
As you can see the following folders contain data that we don’t need anymore and fills our repository with unused data:
vendor/cache/*
vendor/bundle/*
vendor/rails/*
log/development.log
Removing the files from git
To remove the folders specified above I used the commands specified by the Remove sensitive data post from GitHub Help
The only thing I changed was adding -rf to the git rm command to recursively force remove the files because I am dealing with multiple files/folders within the target folder.
Now we can force push our repository so that others can enjoy our effort.
1
git push origin master --force
The result (98,55% smaller)
After following the above steps our repository was shrinked by 98,55 %!. First the repository was 180 Mb and now it is 2.6 Mb
Ofcourse we had this numbers because there were alot of gem files within our repository that were updated frequently and pushed over and over again to the master branch.
I hope this post will help other’s to track large files within there git repository and how they can remove them to shrink the size of there repostiories.
]]><![CDATA[Intro: Start blogging like a hacker(?)]]>2011-12-08T15:28:00+01:00http://manuelvanrijn.nl/blog/2011/12/08/intro-start-blogging-like-a-hackerI’ve just decided to switch from Wordpress to Octopress because I wanted something new and not something over-featured
All the plugins and choice’s I had to made, and the maintenance of all these, just kept me from doing what I supposed to do with it, blogging.
So after some googling what a good alternative would be for Wordpress I found Octopress A blogging framework for hackers. Alright +1 for the title
So basically Octopress generates (bakes) HTML content from the Markdown content you write. I like this simplicity and I love the syntax.
Octopress give’s you the functionality to host it on your own server, but also to host it on Heroku or Github. Beside the Git approach (push your source and deploy the generated code to the master branch) you can use RSync to sync files to your server. I use Github to store my source and generated html.
Enough talking about Octopress for now. I’ll hope to post my next post soon.
 Today I’ve just released version 1.0.0 of my latest gem local-subdomain offering subdomain support for your development environment, out of the box.


 Today I was trying to install the Android SDK for Eclipse for a new project I’ll work on. After downloading the necessary packages I got some strange error I couldn’t resolve quickly, so I like to share the solution with you guys.
 Today I had to reinstall my Linux installation because my harddisk died a quick dead. While configuring all the software I use to develop I got some weird error after I’d installed rbenv and tried to execute